

Learn how to convert your existing business marketing videos to vertical for better Facebook engagement in 5 easy steps.
Why vertical?
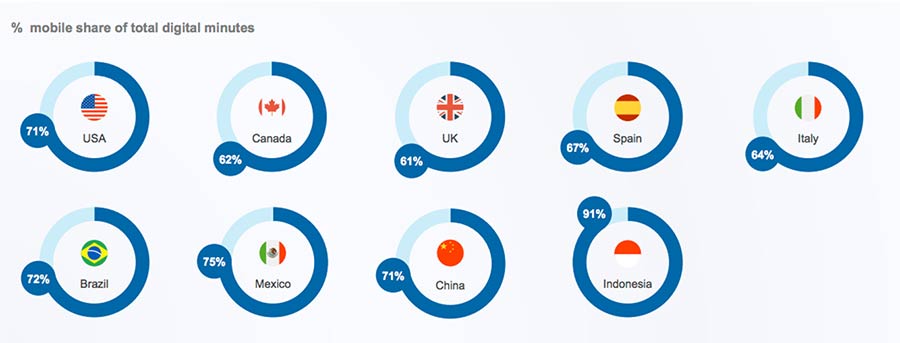
It’s a known fact, that noways the mobile usage dominates globally. In other words, the majority of people in the world tend to consume content on their mobile devises. In fact, in some countries, more than 90% of users access the Internet on mobile!
According to Facebook, 79% of novice vertical video consumers agreed that the format is more engaging, and said they would choose the vertical format in most cases.
As you can see, using vertical videos gives marketers a great opportunity to engage more people on Facebook. Thus, increasing the odds of converting the viewers into customers and improving the conversion ratio of you marketing campaign.
Start by reusing your existing videos
While it may be ultimately better to create new videos designed specifically for the vertical screen orientation, re-creating all of your videos will certainly be time consuming and may get costly.
Why not start by simply converting some of you best performing video ads to the vertical format? It’s an easy and quick process and it will give you the opportunity to test the results before investing into any new vertical videos.
What I’m trying to achieve
For this exercise, I will take one of the marketing videos we made for our partner site TunePocket and convert it to 9:16 full portrait / vertical aspect ratio that should give us good compatibility with Facebook’s advertisement video requirements.
Here’s the original 16:9 landscape video as it appears on TunePocket’s home page:
I will use Adobe Premiere Pro video editor to convert the above 16:9 video to full portrait 9:16 view in 5 simple steps. I’m using a Windows 10 computer, however the steps will be the same on Mac or another Windows version.
Don’t have Premiere Pro? Our friends at TunePocket have created a similar tutorial using Filmora, a popular and affordable video editor.
Switch to: How To Convert Your Business Marketing Videos To Vertical Using Filmora
No previous video editing experience needed!
Premiere Pro is a professional grade software. It’s extremely powerful but can be somewhat overwhelming when you just starting.
But fear not! I will only be using some of its most basic features, so this guide should help even if you have zero video editing skills and no previous Premiere Pro experience.
Jump to the video version of this tutorial
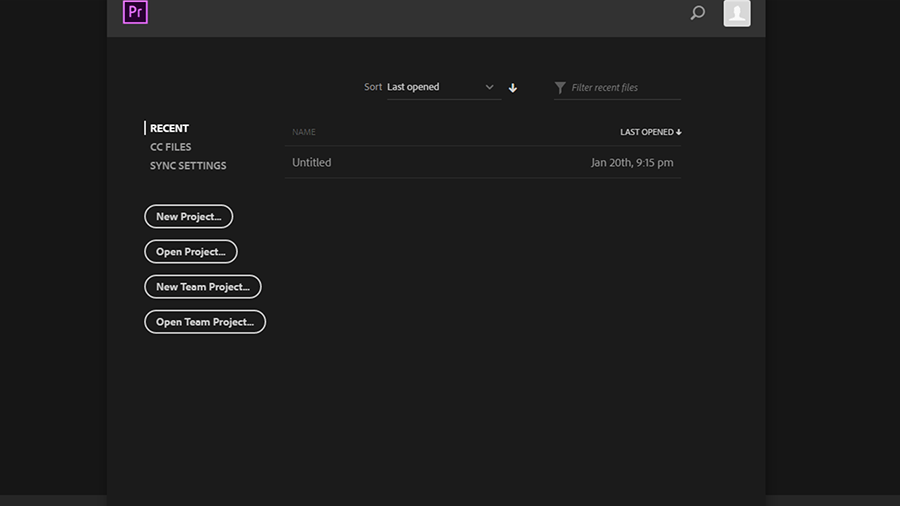
STEP 1: START A NEW PROJECT
In this step you only need to create a new project and pick the file name and location where you want to save it.
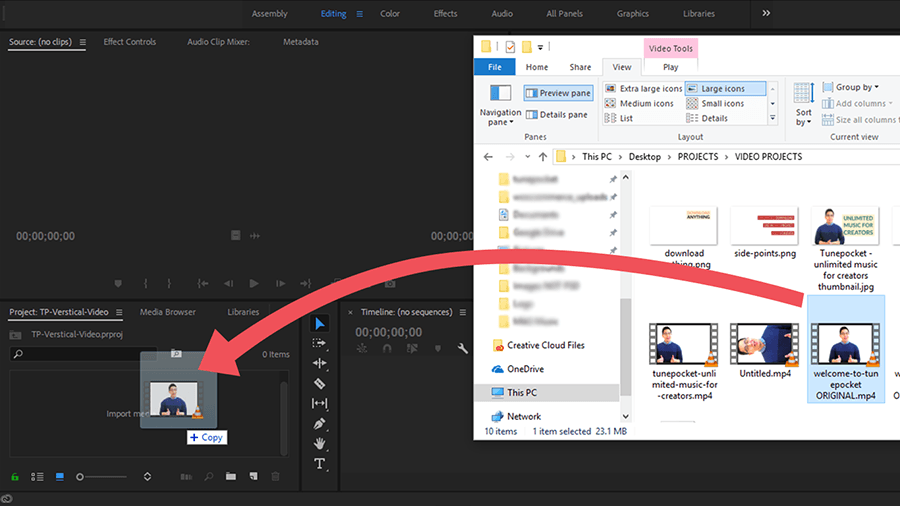
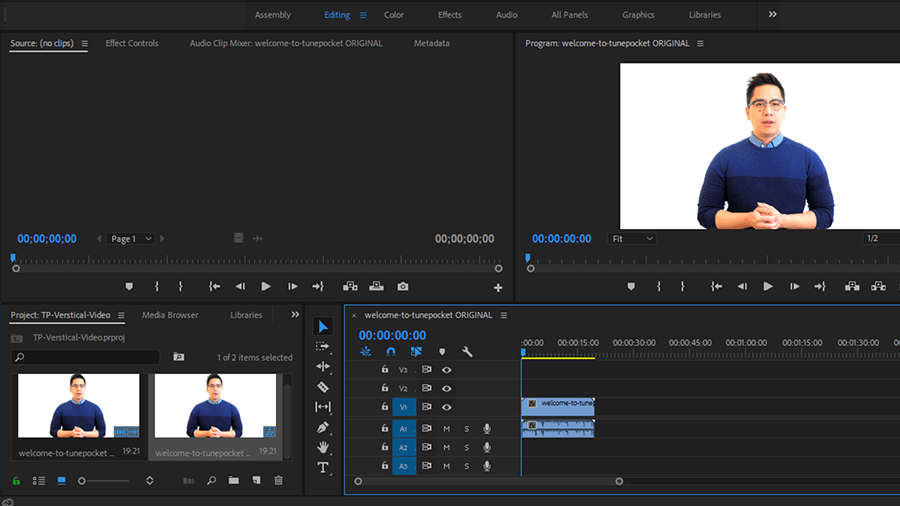
STEP 2: IMPORT YOUR ORIGINAL 16:9 VIDEO
Drag and drop your original video from its location to the media panel in Premiere.
STEP 3: SET UP VERTICAL SEQUENCE
In Premiere Pro, a sequence is a place where you assemble and trim your clips. Each sequence sets the settings (like the aspect ration, frame rate, and so on) that apply to all the video clips contained within the sequence.
You can simply create a new sequence by using our video’s properties. Right click on the video and choose “Create Sequence From Clip”.
Don’t worry about our video having the horizontal orientation, we will fix this momentarily.
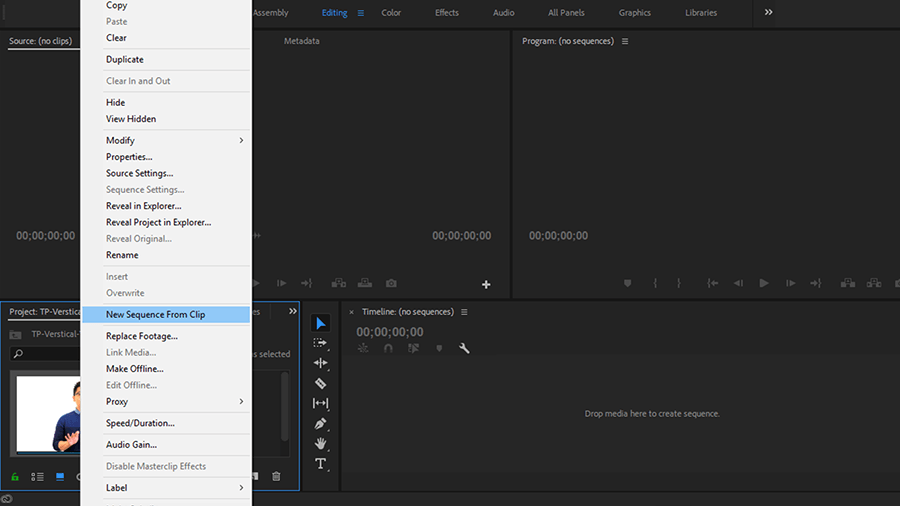
Here I have just created the new sequence (note the new highlighted object in the Media panel, next to the original video). However, as expected, it doesn’t look like the vertical format we need in the Preview (top right). Our next step is to edit the sequence settings:
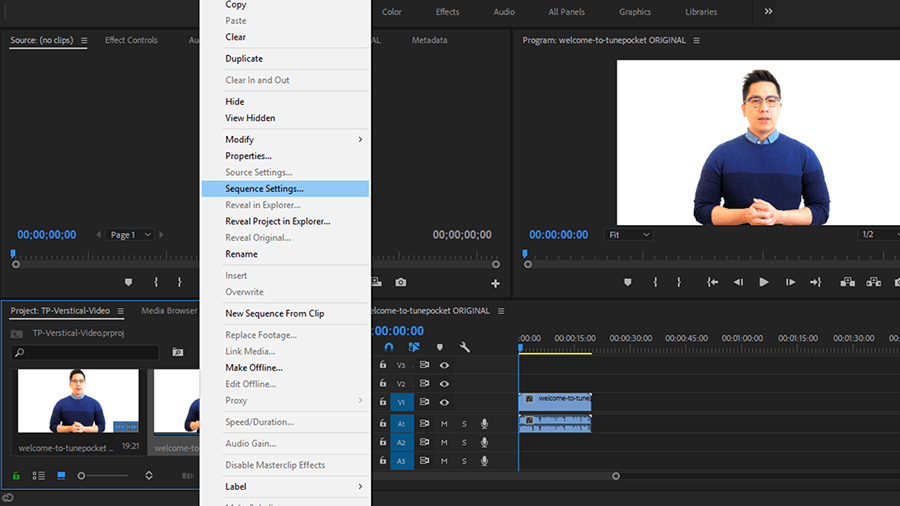
To adjust the settings, right click on the sequence and choose “Sequence Settings” from the menu.
Now change the settings:
a) change editing mode to Custom
b) change frame size to 1080 to 1920 (which will give us the 9:16 aspect ratio)
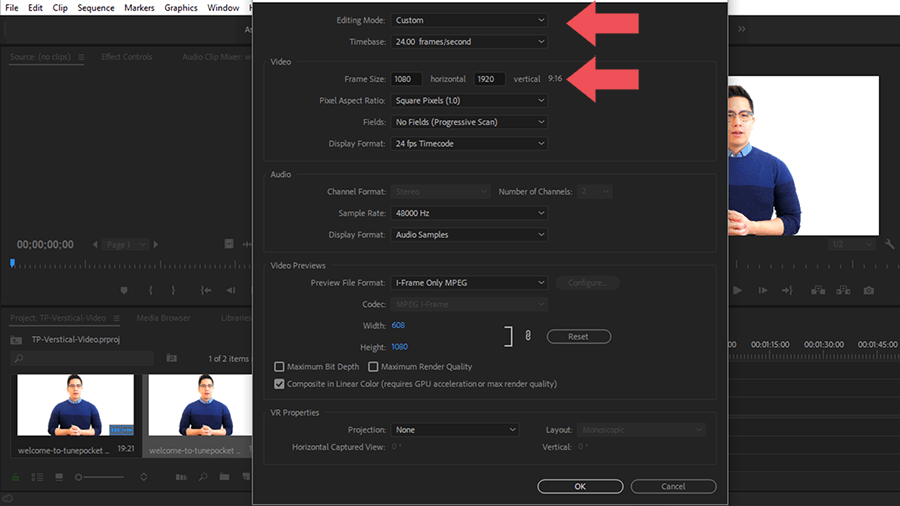
Now, looking at the Preview, the sequence has the proper 9:16 aspect ratio, however the video still does not look right.
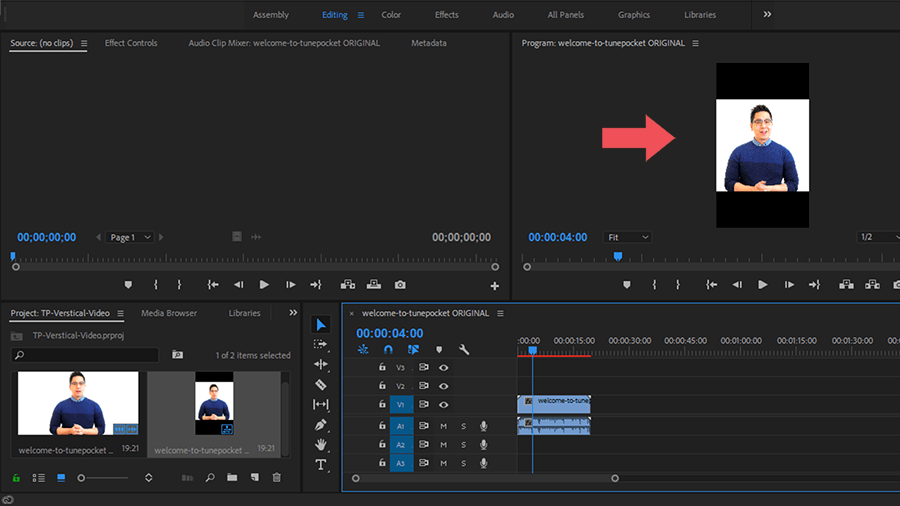
To get rid of the black bars, we need to zoom and re-position the video to make it properly fit the vertical frame.
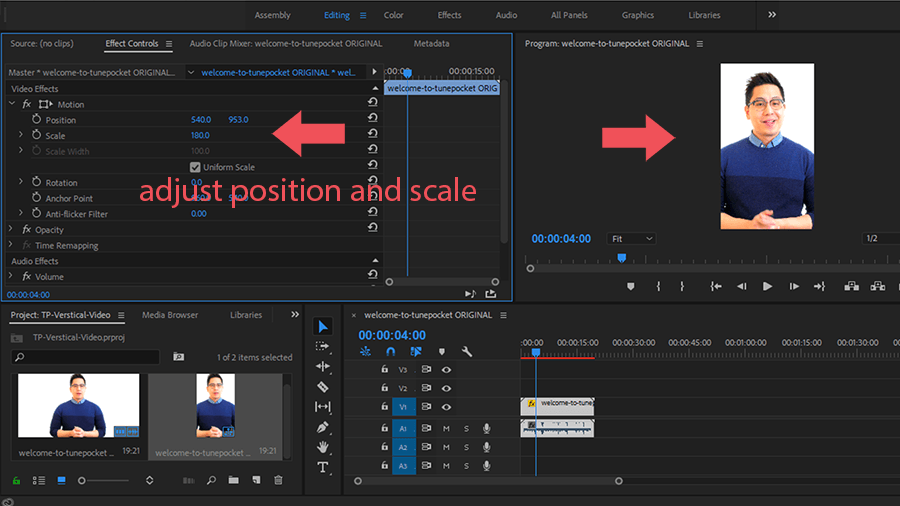
STEP 4: POSITION THE VIDEO
Select the video in the Timeline and look the Effects panel (top left).
Use Position property to move the video horizontally and vertically.
Use Scale property to increase or decrease the size of the picture.
In my particular case, I shifted the original image down a bit and increased the scale to fill the entire frame. You may have to do some different adjustments depending on your video’s content.
If you are satisfied with what you see in the Preview panel, we are ready to render the results.
STEP 4: EXPORT VERTICAL VIDEO
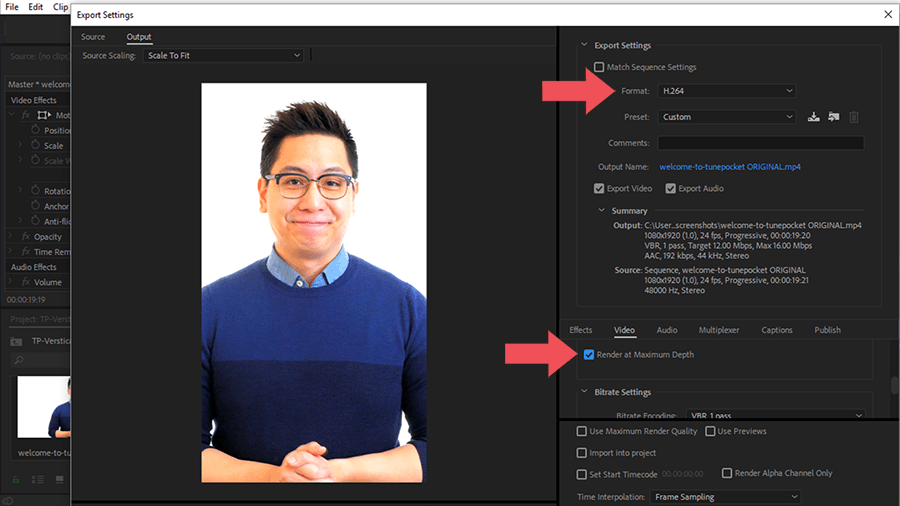
Before you create the final video, you must mark the in and out points in the Timeline. This tells Premiere which part of the video it needs to rendered. In my case I just selected the entire video. You can quickly mark the beginning and the end points by using { and } buttons respectively.
Access the Export settings dialog by clicking Export Media under File in the top menu.
There are plenty of rendering settings to play with. For our purposes simply make sure that you render the video in the Web friendly H.264 format and check “Render at maximum depth” box for better video quality.
STEP 5: UPLOAD TO FACEBOOK
Finally, upload your video to Facebook. Here’s the final vertical version I uploaded to TunePocket’s Facebook page.
I have also added the subtitles by using this tutorial from Adobe: Working with captions
However, if you’re making a video to run as a standalone ad on Facebook, note that Facebook provides a built-in mechanism for generating captions, so you can skip this step.
Also keep in mind that full portrait 9:16 videos may not work in some Facebook feeds (most notably the Instagram).
Please refer to this specifications guide that explains which aspect ratio works for each Facebook feed.
Finally, I used Adobe’s Spark to create the end splash screen.
The last but not least.
While renewing a video, why not give it a new soundtrack to make even greater impact on your audience?
SafeMusicList offers an extensive collection of professional quality background music created specifically for promotional marketing videos and cleared for commercial business use. Browse our royalty free music collection.
Making lots of marketing videos?
Save on music licensing fees with unlimited access subscription.
Video tutorial
Related
- High-Quality MP3 320 Kbps Music Downloads Without Copyright Issues
- Best Places To Download Free Stock Footage
- How To Legally Use Music In Commercial Business Videos
- 5 Must Have Marketing Videos For Any New Business
- How To Bring Your Vlog From Obscurity To The Top Of YouTube
- 5 Best Christmas Video Ideas For Holiday Business Marketing
- Choosing Music For Business Video? 3 Rules You Can’t Ignore (Infographic)
- How To License Music For Commercial Video (Infographic)
- Choosing Music For Real Estate Video? 3 Rules You Can’t Ignore: Infographic
- 3 Key Elements Of A Successful Real Estate Video (Infographic)
Hello / Thank you for the great video tutorial ..
‘How To Convert Your Business Marketing Videos To Vertical which I found very helpful!
Please can I ask how you created the colourful ‘speech bubble effects’ used during the ‘How To Convert Your Business Marketing Videos To Vertical’ tutorial.
Was it using a specific piece of design software ?
Thanks
Mark